With almost 10,000 mi. of travel experience, am I still happy with the Transit's performance as a RV chassis? Yes.
I have not yet weighed our rig when loaded in our usual travel configuration--clothing and personal items, food, camping gear, etc. The Smart car that we pretty much always have in tow weighs about 1,900#. The most challenging route we have encountered so far is several trips over Raton Pass between CO and NM. Raton has a 6% grade at 7,800' elevation. I can maintain the 55 mph speed limit either direction. I have not tried Vail Pass yet (7%, 10,666'), but I expect that would slow us down. The 3.7L Transit V6 revs freely and the 6-speed transmission shifts as needed, so I have no concern being able to handle most any driving situation. Also, going up steep mountain grades is a small portion of our travels anyway. We once owned a Minnie Winnie Class C that had a Dodge big block (400 c.i.) V8 that barely pulled the same grades at 30 mph in low gear, and not towing anything.
As far as gas mileage, that has been pretty consistent at 12.5 loaded, towing car, and running A/C. I have not driven much unloaded (no towing, no A/C), but when I do, the ScanGauge and dash computer both indicate 14-15 mpg consistently.
Monday, October 16, 2017
Monday, October 9, 2017
15 - Maxx Fan & Water Filter
I have also mentioned the omission of a high volume fan like a Fantastic or Maxx fan in the Orion. I had a Fantastic fan in our last Class B, and it was fine. I opted this time for the Maxx fan only because I liked the dual support arms vs. the Fantastic single arm. Probably not that big a deal. I got the most basic manual model just as we had before and it serves our purpose well; mainly, to exhaust air at good volume with multiple speeds from whisper to jet.

Not having a ladder (prior to installation detailed in previous post), and being concerned about running a power supply wire, I engaged a mobile RV technician to help. It was an expensive choice (3 hours charged labor), but I just wasn't confident for this task. The job was pretty straightforward; remove the manual center vent and clean up, run a 12v supply wire, and install and caulk the new fan. Running the 12v wire was the time eater. The Orion has aluminum spar rafters with solid foam between them, the ceiling, and the roof deck material. We opted to get the power from the rear vent bath fan. One spar was immediately to the front of the bath fan, so a hole was drilled in it. A wire probe pushed from the center vent through the foam to the rear didn't hit anything until it hit the rear vent spar, or so we thought. It would have seemed reasonable to push a wire from the rear vent through the drilled hole and aim for the center vent, but that wasn't possible because of interference of the rear wall. So it was a matter of pushing the probe from the center vent and try to hit the drilled hole. It was finally located and the wire pair was pulled through. Connections were made to the rear fan supply and the Maxx fan installation was completed.
This installation was definitely worth it. We have spent many comfortable nights sleeping in warmer weather by turning the fan on to a lower speed and only opening the vent over the bed which brings the cool night air right in on us. Also shown in the picture is the full-length mirror I installed on the bathroom door.
We like to have a water filter for drinking water and coffee and tea. I found a Culligan kit which included a faucet, cartridge filter, connection adapter, and water lines. I drilled a hole through the counter at the right rear of the sink and mounted the faucet. I disconnected the cold supply hose at the faucet and installed the adapter tee, then reconnected the supply hose. I put a reinforcing board behind the panel under the sink and mounted the filter bracket to that. Connecting the lines to the filter, faucet, and adapter was just a matter of cutting to fit and push into the respective connector sockets. I like this filter because it only takes a quarter twist to remove or install it. We never buy bottled water because the filter makes all water we have encountered taste just fine. I use the basic carbon filters, but you can get higher filtration types. Same in our houses.

14 - Rear Ladder
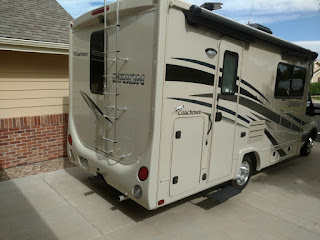
The Orion 24RB does not come with a rear roof ladder, which is probably a cost-cutting decision since so many of Coachmen's other models include them as standard. Most of my previous RV's had ladders, and I find that I often want to get up on the roof for inspection or maintenance work; especially when I am travelling and do not have access to a regular ladder. Therefore, installing a ladder on my Orion was on my "to do" list.
I wanted a black single piece ladder but it so happened that Amazon had an unbeatable price on a chrome-color jointed ladder, so that's the one I opted for. Now the instructions say, and I am well aware, that the ladder mounts need to be screwed into solid material to support the weight. Thinking about the lightweight "Azdel" construction of the Orion, I was pretty sure that solid backing was not likely, and more so given the relatively limited mounting location options.
So, I spent a lovely (and full) day planning, measuring, cutting, and fitting to get it right. Once I had everything fit and assembled, I drilled the holes for all the mounts. At each mount point, I scuffed the surface of the Azdel, mixed and applied some 3,300 psi marine epoxy, and screwed each mount into place. I was right about having no solid material to drill into, only the thin ply of Azdel and backing material. But with 32 screws and about 15 square inches of epoxy bonded contact, it seems to be more than strong enough.

13 - Side Table & Add'l Shelf
There is quite a bit of space between the front end of the couch and the driver's seat. The floor of that space turns out to be a pretty good place for our cat's litter box. Adding a "table" over the space helps hide the litter box some as well as give some extra surface to set things on.

I found the shelf at IKEA. The size was just right so I didn't have to do much sawing to fit, and the color is a pretty good match to the rest of the decor. I mounted the shelf/table to the wall using a "L" bracket underneath. The table sits on the end panel of the couch held in place with double-side tape.
There was enough shelf material left over to make a small corner shelf for use from the rear side of the bed. Now the person on that side has a place to put their glasses or book at night. It is mounted with glue and a couple of small "L" brackets on the top that aren't easily seen from below.

12 - Remount Main TV
I previously posted how the main front TV was mounted so low that the "eye" for the remote control was below the line of sight to control the TV while seated. I had to hold the remote up near the bottom of the bed to operate the TV. So, a remount was necessary. I unplugged the TV from the outlet in the right side compartment and then unscrewed 4 mounting screws that were accessible on either side behind the TV. These screws were through a mounting board and into the front wall panel. The TV is pretty light, so I was able to hold it to disconnect the A/V and antenna cables and pull the power cord through and free, and lay the TV aside.
Next, I measured the length of the mounting board attached to the back of the TV and marked two vertical reference lines with masking tape on the front wall panel to the outside of the centered width of the board. I cut two lengths of 2x4 stud lumber to a sufficient length from the joint where the front panel angles back to another panel and down below the original mounting holes. These are spacers to move the TV closer to the front edge of the ledge it sits on as well as raise it a bit. Since all this material is out of sight behind the TV, precision and appearance are not critical. If you stand close at either side of the TV, you can just see the mounting. For that reason, I painted the edges of the mounting board and spacers black.
I glued and screwed the spacers to the forward panel using the tape reference lines to locate them. In preparation to remount the TV, I first installed a 10 inch HDMI extender cable into one of the spare ports on the back of the TV. I previously discovered that the way the TV was mounted, it was impossible to get my hand behind it to plug in an auxiliary HDMI device. The extender cable socket is now accessible at the left side of the TV.
Remounting the TV was a reversal of the removal steps. Route the power cable back to the right compartment, reconnect the A/V and antenna cables, and then position the TV by centering the mounting board in front of the newly installed spacers. Then I drove the original mounting screws through the original mount board holes into the spacers. The spacers added enough distance so the TV sits on the ledge near its front edge with the remote "eye" well exposed to any angle of view. One added detail in the pre-mount sequence was to put a couple of short strips of thin foam insulating tape on the bottom edge of the TV so it wouldn't make contact noise while sitting on the ledge. They don't show from the front. Now I can operate the TV without having to stand up, and I can easily plug in my laptop or Roku via HDMI cable.

Subscribe to:
Posts (Atom)